Monday, January 30, 2012

2012... Here we start again!

Another year just flew by, and I find myself trying to renew my enthusiasm for my blog. LOL  I am doing a couple photography projects this year. Film 26 shoots a photo inspired by a letter of the alphabet every two weeks - FILM ONLY! I'm breaking out the vintage cameras....the Polaroid 250 Land Camera for this one:) 


A is for Angel
FILM 26


The other is Project 12 sponsored by MCP Actions.  A photo a month based on a photo prompt from the MCP blog:)  January's photo is about *Resolution*.   What better than to start the year with a dreamy Polaroid from my vintage SX-70!  Join the fun here! http://bit.ly/mcp-project12


Resolution 1/12
MCP ACTIONS - PROJECT 12


What are you finding to keep you motivated through the year?


Tuesday, February 15, 2011

Slice of Life


I just completed a fabulous photography e-course led by Darrah Parker over at Slice of Life.

Here are a few of the subjects she covered and some of the pictures I took:

Week 1: What Matters to Me
Week 2: Composition, Creativity & Cropping
Week 3: Let There Be Light - Using your flash
Week 4: People in our Lives - Body Language & Photographing Faces
Week 5: The Decisive Moment & Tell Your Story
Week 6: Putting It All Together


Here is a video she put together, at the end of the class, showcasing photographs from all the students - http://vimeo.com/19759564 . The music is really wonderful jazz played by her husband and his band the Jason Parker Quartet:) 

If you are interested in a fun photography class and meeting new Flickr friends, this is a great class and well worth the time:)


Wednesday, February 9, 2011

Creating Collages with Picnik


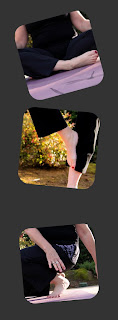
I wanted to create a simple collage using 3 photos I took during the self-portrait class Wading In with the lovely Miss Viv:)  I had heard about Picnik, and the programs they had, and decided to give it a try:) 

1. Log onto their website at http://www.picnik.com/ and create an account if you don't already have one.
2. In the free account they only allow you to upload 5 pictures at a time, so choose the 3-5 photos you want to use.
3. Click on the collage button.  There are 12 *Basic* templates you can use for free without having to upgrade to premium.
4. Choose a template and then drag and drop the photos into the spot you want them in.
5. You can make slight adjustments on centering by moving vertically or horizontally within the template *frame* on each photo.
6. Slide the Spacing bar to increase or decrease the amount of *leading* or black grid between photos.
7. Slide the Proportions bar to lengthen or shrink the frame width.
8. Slide the Kookiness bar to give your photos a little tilt.
9.Slide the Roundness button to adjust photo shape from square to rounded edges.

In this version I used more spacing, roundness and kookiness!

10. Once you are done you click on Done then click on the tab at the top Save & Share.
11. Save to you desktop, or a photo file of your choice, and you're done!


This is the collage I originally made:)

This was so easy and fun to use:)  I think I will return to Picnik again the next time I need to create a photo collage!

Thursday, February 3, 2011

Lunar New Year

Welcome to the Year of the Rabbit:)  I am doing a self-portrait photo class and did a photo shoot out by the pool this morning.  It was quite chilly!  I decided to try my hand at writing a couple haiku to celebrate the new year, too<3


Windblown, I attempt
to breathe in peace, breathe out joy…
quiet thoughts prevail.


Shivering, I pose
like an oak tree rooted deep
in tranquility.
  
Holding Peace

Yoga Props


You can even make a collage with your photos in Picnik.  So easy even using the *free* version.

Happy New Year!


Thursday, January 27, 2011

Easy DSLR Flash Diffuser


Are you a Photojojo fan?  I just love some of their fun, offbeat project ideas so when this one came up again in an e-course I am taking, I just had to try it out.

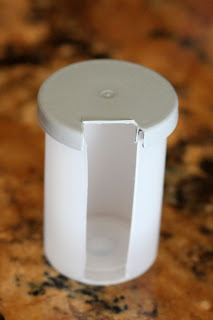
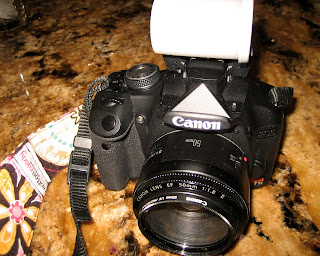
To make a flash diffuser for the little pop-up flash on my Canon Rebel all I neede was an empty *clear* film canister (with cap) and a  pair of scissors.  I made a rectangular cut, the width of the base of the flash, and then slipped it on.  To finish, I popped the cap back on the end to stabilize it:)  So easy and it works great...and it's FREE!

The finished project:)

Without the flash diffuser.

With the flash diffuser.  SOOC = no Photoshop!

On my Rebel:)

Let me know if you make one for your camera and how it works for you!


Tuesday, January 18, 2011

2011...I resolve to post more often:)


After setting up this blog last year, I have not been very good at posting anything to it.  After having my site linked in 2 other blog friend's posts, I guess I better get busy!

Tuesday, October 5, 2010

Quintessential Fall

Finally, after an amazingly hot September, Fall seems to have appeared.  There is a crispness to the early morning air that's been missing.  Only 5 days behind schedule with starting my class, Picture Fall with Tracy Clack, I finally got the camera out searching for those first symbols of Fall.  The journey begins....